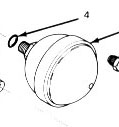
 Accumulator "bulb"
Part # 18038507 Approx. $60.00-$70.00
Tools needed:
- Rag
- Open end wrenches
Step 1
Locate the accumulator "bulb" on the side of the PowerMaster unit. The original style accumulator has a smooth face and requires removal by using a thin open end wrench on the base of the bulb. The replacement/upgraded style bulb has a yellow warning label printed on the face in a circular fashion and has a cast in hex "nut" on the face . Note which style you have.
Step 2
With the KEY OFF, pump the brakes 15-20 times to totally depressurize the system.
Step 3
Wrap the rag around the base of the bulb, being careful to shield the fender liner and ESPECIALLY any painted areas. If a small drop of brake fluid can seriously cloud and ruin a nice paint job.
Step 4
Now loosen and unscrew the bulb. The rag should catch any stray drips.
Step 5
Lightly lubricate the O ring on the new accumulator bulb with a drop of brake fluid and then screw on the new accumulator bulb.
Step 6
Turn theKEY ON and allow the system to repressurize and check for leaks.