 |
|
Compressor:
The R4 Compressor is used on the Turbo Regal/Grand National.The R4 Compressor is a radial designed four cylinder type compressor. Post 84 units utilize a simple lip type shaft seal as opposed to the pre-84 versions which use a carbon type seal. These seals are not interchangeable. If you are servicing a unit whose origin is not known, you must replace seals with the same type as you took out.
Servicing
It is possible to do some service in the vehicle, however, it is recommended you save disassembly for the workbench.
 |
 |
Clutch removal (for replacement of bearing or seal):
Reclaim remaining refrigerant, disconnect the refrigerant lines, take off the belt,remove the electrical connections to the coil and to the rear of the compressor, remove the compressor from its mounting bracket. Put unit in a soft jawed vise or fabricate a jig to hold the compressor in a vise for you, and remove the center shaft nut (13mm),if necessary use tool illustrated above in left illustration to hold clutch plate stationary. I personally find the a couple jolts from a 3/8's impact gun will break the nut loose.Just be careful when tightening that you don't snap the shaft. Use your feel for the tool to know when its tight. If you're not familiar with the tool, I'd suggest you make or buy a tool to hold the clutch plate stationary and do it by hand.
Remove clutch by removing the retaining nut, then using a clutch removal tool, (sometimes you can remove the clutch by prying it off with two screwdrivers located 180* apart but I have been unsuccessful with this compressor) The tool is illustrated in the right illustration.Once the clutch plate is removed, there will be a snap ring holding the pulley on. Using snap ring pliers remove the ring, slide off the pulley. Next will be another snap ring holding the clutch coil on, remove this last snap ring and remove the clutch. I went this far because usually when the pulley bearing goes, the pulley rotates crooked and damages the clutch coil.
 |
 |
Seal Replacement (remove only the clutch plate):
You will need a shaft seal removal/installation tool (KM486 or equiv), as illustrated in the left figure.Insert the seal tool, press down lightly, turn until the tool locks onto the seal, pull out the seal and the tool straight. For the o-ring seal, there is a tool illustrated in the right figure but,I use a lip seal tool and if you're careful you could use a dental type pick.
Seal Installation:
Lubricate and install O-ring into pulley cavity. Place the seal protector over the end of the compressor shaft.(Without the right tool I don't know what you could use for this, maybe a valve seal protector? I dunno.)Lubricate the new lip seal and install on the installation tool. Push the seal into position on the compressor shaft,remove the installation tool, and the o-ring protector. Install the clutch plate, shimming it so it does not rub the pulley when not engaged say .010"-.016"if memory serves me.
If you've just reinstalled your compressor, its time to recharge. Please seethe Troubleshooting section for procedure.
Condenser:
The Condenser is a radiator for the refrigerant. It is really pretty self explanatory. Its job is to condense vapor refrigerant into liquid refrigerant. Not much can go wrong with one other than clogging from debris (inside OR outside ~ inside meaning compressor time) or leaks. In the clogged case, sometimes you can flush it out.Leaks..with R-12 as expensive as it is today, I'd just replace it. I wouldn't chance it leaking after the repair.
Condenser R&R
Reclaim remaining refrigerant. Remove radiator cooling fan (In 86-87's it is easier to remove the intercooler). Remove radiator. Disconnect lines. Unbolt and remove. Replacement is reverse of removal.
For recharging, see the troubleshooting section.
Evaporator:
The Evaporator is the device which transfers the heat of the interior of the car to the refrigerant. It is basically a radiator constructed of aluminum which dissipates heat better than say copper or brass.
Evaporator R&I
Disconnect the Negative battery terminal, reclaim refrigerant. Disconnect wiring, lay to the side. Remove the high speed blower relay, blower motor, wiper arms, cowl trim. Remove 5/16"screws from the perimeter of the heater box. Remove 1/4"screw from inside the blower cavity. Remove the 7/16"push nuts from the firewall. Carefully pry off heater box cover. Remove the accumulator. When reassembling, make sure to reseal where the heater box cover meets the firewall. I personally use black RTV. Another good idea is to use 3M"Stripcaulk"around the perimeter of the heater box. When reinstalling lines to evaporator, make sure to lubricate the O-rings with refrigerant oil.Finally, evacuate system at 30"hg for 30 minutes minimum, and recharge as instructed in the troubleshooting section .
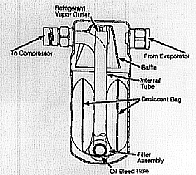 |
Accumulator:
The accumulator contains a desiccant, or dryer, which removes moisture from inside the system.
Accumulator R&I:
Disconnect negative battery cable, loosen and separate refrigerant lines. Loosen bracket, and remove accumulator. Drain accumulator of refrigerant oil into a measuring cup. Replace with amount drained plus 2 ounces. Installation is reverse of removal.You MUST use new O-rings lubricated with refrigerant oil upon reassembly, to eliminate chances of leakage.
Pressure Cycling Switch:
Located on the top of the Accumulator is the Pressure Cycling Switch. This switch is designed to turn on the Compressor at 46psi and turn off the compressor at 25psi. Additionally, the switch will disable the compressor in the event of a low refrigerant charge, or cold (under 37*)ambient temperatures.
Replacing the switch:
Simply, unplug the connector, unscrew the switch, and screw on the new one.
 |
Orifice tube:
The Orifice tube is located in the evaporator inlet or in the condenser outlet. It controls the flow of refrigerant into the evaporator. The orifice tube replaces the previously used expansion valve.
The tube has no moving parts and is NOT adjustable. If defective, it must be replaced.
Orifice Tube Replacement:
Find a spot in the high pressure line (The smaller of the two) and look in the area of the accumulator. You will find a spot that is dimpled. Disconnect the line at that spot. In the side going to the Evaporator you will see a little plastic tab. Carefully grasp the tab with a pair of needle nose pliers. If it wont come out, don't force it. Try heating the pipe a bit to soften the rubber o-ring and it should come out. Noting position and orientation, lubricate the inside of the pipe and the seal on the tube and install the new orifice tube.Evacuate and recharge the system as outlined in the Troubleshooting Section.