- Impact gun or 1/2 drive ratchet
- 15mm socket
- 15" 4x4
- 36" 2x4
- 4 Jack Stands
- Floor jack
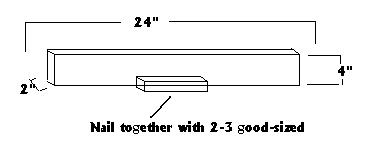
- Before you begin, you must make a "tool". I used a 30" piece of pressure treated 2x4 and stood it up on the 2" side. I then took another 10" piece and nailed it to the bottom of the 30" piece so that it forms a "T" like the picture at right. We will refer to this as a teebar.
- If your body filler panels are brittle and prone to cracking, it will be necessary to remove both your front and rear bumpers. Mine were flexible and I just placed a rag in each corner of the bumpers so that they would not gouge my filler panels. In any case, it is a good idea to remove the bumpers as it is not very difficult. Had I known this beforehand, I would have done the same thing. I didn't realize this until I was halfway through the procedure.
- Jack up car so that all 4 wheels are off the ground. The higher the better, it will give you more room to maneuver around under the car. Be sure to leave the wheels on the car as you need that extra weight.
- Using a 15mm impact socket and impact gun, unbolt all 14 body mount bolts and remove the bolts. I sprayed each bolt with some rust penatrant first. It's much easier with the impact but can be done with hand tools, just be careful not to snap any bolts. It is also easier if your car has not been exposed to winters and road salt. Even though we are only going to do one side at a time, it is much easier to have all 14 unbolted so the body can be jacked up more easily.
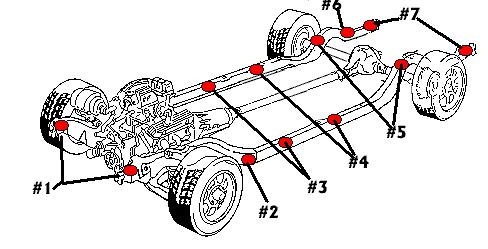
I replaced bushing numbers 2-7 and added the #5 GNX bushing on the rear over-the-axle hump. The #1 usually does not need replacing as it is way up front and higher than the rest. It's not exposed to the elements as much as the others.
- Starting at the rear of the car, you will need to install one side at a time. Place the 4x4 (vertically) on the lip of the gas tank near the rear of the 1/4 panel. There is not much weight being jacked up here, so no damage will happen to the gas tank.
**While Jacking any part of the body off of the frame, be careful and pay attention to the rest of the car so it does not come off the jack stands.**
- Once the body has been raised about 5 inches, you can reach up and slip out the #6-7 upper bushings and slide in the new ones. Do not put any bolts back in yet, that will be the last step. Also, if you are installing the #5 GNX bushing, you can slip that one in now. There is a hole about 1 inch in diameter where it will fit on the frame going over the rear wheel. It is a flexible bushing, so you may use a long 3/8 extension to "persuade" it into position. Lower the jack slowly making sure that the bushings seat properly.
- Depending on the lift height of your particular floor jack, it may be necessary to use a few pieces of 2x4 nailed together or some other type of spacer to get the body up high enough off of the frame.
- Now is the time to use the teebar we made in step one. Under the door there is a "lip" on the body of the car. Center the teebar on this lip and slowly raise the car. With the car raised, you can now slip out the #3-4 bushings. It may be necessary to lower the body and reposition the teebar closer to the front of the car on the lip in order to remove the #2 bushing. If so, lower the body and move the jack forward a few inches so that you can raise the body from a different location.
- Once done, lower the body and using the same procedure, do the other side.
- Once finished the second side be sure the bushing are all seated properly, you can use a long punch or screwdriver by probing up where the bolts would normally go in. If they aren't right on the money, you can jack the body up slightly to take some tension of the bushing and it should fall right into place.
- Now we can bolt the body back to the frame. I found it easier to put some grease on the threads of the bolts after I wire brushed them. It makes it easier when going back into the body. I just used some red wheel bearing grease. Tighten all body bolts down snug.
**Be sure to put your lower bushings on the bolts before you put them in.**
- The #3-4 lower bushings are missing on most Regals and were missing on mine also. After all 14 bolts have been put back in, go back and re tighten all of them as the rears may now be loose now that the front is bolted back down.
The total procedure take about 2.5 -3 hours if everything comes apart smoothly. The 2nd side is easier than the first now that you have gotten the hang of it. Once completed my 80k mile GN rides like a BRAND new car. Body roll is noticeably much better and there are no more squeaks, that's right, NO more squeaks when I hit a bump!