The way to remedy this situation is to install the 12 inch front disc brakes used on the mid '80s IROC Camaro's and/or B-body sedans (Caprice) with police package brakes.
- Left and Right spindles and dust shields from a late '80s B-body (Caprice) with police package brakes (12 inch)
- Left and Right calipers from the same B-body donor car mentioned above
- 12 Inch rotors from a mid to late '80s IROC Camaro (IROC rotors have the 12 mm metric studs, Caprice rotors are 1/2 inch studs)
- A set of Hotchkiss or Global West upper control arms (your choice)
- Fabricated 1/2 inch steel spacers (see below)
- Fabricated 1/8 inch Aluminum wheel spacers, depending on wheel choice (see below)
- Jack up the car, supporting it underneath each lower control arm, so the coil springs support the chassis weight. Remove the wheels from each side.
- Unbolt the calipers and lift them off the spindles. Tie them up out of the way or rest them on the upper control arms so the brake line will not be stressed.
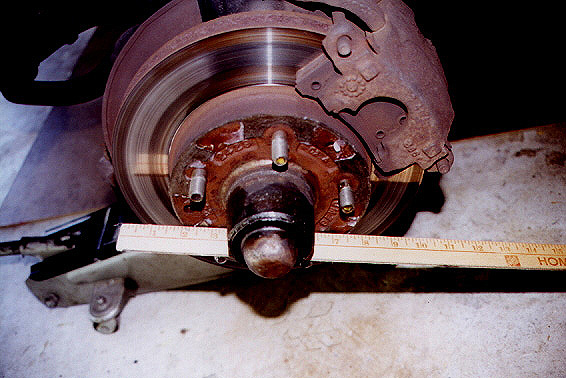
- Remove the cotter pins and nuts from the upper, lower, and tie rod ball joints, separate the joints, and remove the spindle and rotor as an assembly. Set it aside.
- Remove the upper control arm retaining nuts and remove the upper control arms. Save the shims and note the location of all the shim stacks. You will be reinstalling the shim stacks in the same locations after the spacers are installed to get a rough alignment that will get you to the alignment shop without ruining your tires.
NOTE: If you are installing Hotchkiss upper arms for the first time now, subtract 3/8 inch worth of shims from each shim stack before reinstalling the shim stacks.
- Install 1/2 inch thick spacers on each upper control arm mounting stud. They can be made from 1/2 inch thick 1.25 inch steel bar stock. Cut four pieces into 1.25 inch lengths and drill a 1/2 inch hole in the center of each. Re-install the shim stacks on the studs from which they were removed and install the Hotchkiss upper control arms. Install the nuts on the studs and torque.
NOTE: The 1/2 inch spacers are based on the use of Hotchkiss upper control arms, which are 3/8 inch shorter than stock arms. Use of different upper control arms will affect the thickness of the spacers required.
- Install the B-body spindles and IROC rotors onto the upper, lower, and tie-rod end ball joints, torque the nuts, and install the cotter pins.
- Install the new larger calipers and pads onto the spindles.
- Set out a towel or drip pan to catch the brake fluid and disconnect the brake hose from the stock caliper. Working quickly to minimize fluid loss, install the hose onto the new larger caliper using new seals and torque it. Avoid dripping fluid onto the rotor or pads.
- Bleed both calipers and check the brake pedal for firmness.
- Install the front wheels and check for clearance. In my case, I used the 16x8 inch GTA wheels with the "rear" offset on the new rotors, which requires a 1/8 inch spacer between the wheel and rotor to prevent the tie-rod end from "shaving" the inside wheel weights. These wheels can be installed without spacers if there are no wheel weights on the inside of the wheels. Clearance between the wheel lip and the tie-rod end is approx. 1/8 inch without spacers. As a side note, the stock aluminum wheels used on the '84 and '85 GN/TR will bolt up to the new brakes. I don't know if the steel wheels used on the '86 and '87 GN's will bolt up.
- The new rotors and calipers will move the wheels outward approximately 5/8 inch in the wheelwell which may cause fender clearance problems with some wheel/tire combinations. The "rear offset" GTA wheels I used have 16 mm of negative offset which mostly cancels the extra width of the new rotor/spindle setup. They do not rub except in extreme lock turns (on the inside) with 225/55R16 tires.
- Immediately drive your car to the nearest alignment shop and have the front end aligned. In my case, the alignment settings I used are:
Camber: 0 degrees
Caster: 3 to 4 degrees positive
Toe-in: 0.2 degrees positive total
In my case, these settings used up all the threads on the upper control arm studs, so some installations may need slightly longer studs.
 |
 |
|
|
|
 |
 |
|
|
|
That's it.......!