Huh? You say. Well, how is that Jackass armed with a slim-Jim and a screwdriver going to diagnose a no-start condition as he's attempting to cruise away in your pride and joy. "But my car starts just fine", you say. Therein lies the problem. Each time you walk away from your car it needs to be 'disabled'. Now think about the problems people have experienced in trying to start their car.
Bad grounds, bum relays and blown fuses are fairly common. Suppose we build one or two of these 'problems' into our cars so that only we know how to start the engine. Two of the most popular anti-theft measures that I can think of have been unplugging the orange ECM lead next to the battery or reaching up under the back bumper and unplugging the fuel pump wiring harness connector. Pretty effective and relatively easy but not easy enough.
What you really want is a hidden switch or connector somewhere in the vicinity of the driver's seat so that using it is convenient. I'll review the set-up that I use in my GN in the hopes that others follow suit and secure their Buicks. One reason that I like the following approach vs. a hidden toggle switch is that if the Jackass happens to get lucky and find your switch, he's gone…with your Buick. The poor man's "pass-key" doesn't have the appearance of an anti-theft device so it's easily overlooked even though it's right out in the open. Secondly, even if the Jackass was wise to your "pass-key", I defy him to defeat it. You'll soon see why.
| The shop manual is handy in identifying the wires in your harness so that you're sure which ones you want to interrupt. Once you have made your selections, trace the wires from the ECM back into the harness a ways so that the splicing you do can be hidden easily within the factory loom when you're done. The idea now is to snip the desired wire and extend both ends back to the driver side of the dash. Being stealthy is the name of the game so cast aside proper vehicle wiring technique and use all one color, preferably black. Or you could use six different colors, the idea being to not make it obvious which two are to be paired. IMPORTANT: Use some masking tape to temporarily label the wires or you'll not be a happy camper. Choose a place where all your wires will terminate so that you know how long to make them. The area near the ALDL is a good spot.
Now, assuming that you've interrupted three circuits, you should be looking at six wire ends under your dash. If you've only done two, that's fine. Fetch a pen and a piece of paper and make a diagram similar to Figure 1. Note: Pick your own pin positions so that your set-up is unique. Once you've decided how to terminate your wires, break out the soldering gun and attach them to the female connector. Be sure to remove your masking tape labels when you're done. (If you're up for it, solder an extra dummy-wire in there on an unused pin and run it somewhere into one of the under-dash harness looms. Just one more wrench in the works for Jackass.) Affix the connector under the dash where it is convenient for you to reach it. I used a zip tie. Now is a good time to verify the effectiveness of your work. Try to start your car…it shouldn't. See Figure 2. Using your diagram, connect the appropriate pins on the male connector using small wire loops that will fit inside the connector body. This will be your "pass-key". Plug the connectors together and verify that your car now starts right up. If all is well, use the second male connector kit you purchased to make a back-up key in case you lose your original. Stow it hidden away somewhere in your car to avoid stranding yourself. Ol' Jackass with a screwdriver has just been screwed himself. Let's just hope he doesn't return with a tow truck. |
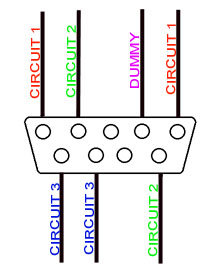 Figure 1 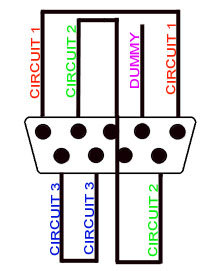 Figure 2 |